
![]()
![]()
|
|
|
|
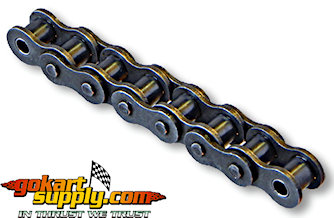
Go Kart Chains and Mini Bike Chains. Standard Roller Chain for most brands. Masterlinks, Halflinks and Chain Breaker Tools. #35 Chain, #40 Chain, #41 Chain, #420 Chain, #50 Chain, Double Row 50 Chain and UTV Chain.
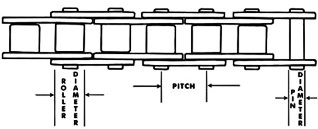
| Standard Roller Chain Specifications & Strengths | ||||||
|---|---|---|---|---|---|---|
| Chain Size |
Chain Pitch |
Roller Diameter |
Roller Width |
The Pin Diameter |
Average Tensile |
Pounds Per Foot |
| #35 | 3/8" | 3/16" | 3/16" | 1/8" | 2,100 | .22 |
| #41 | 1/2" | 5/16" | 1/4" | 1/8" | 2,000 | .28 |
| #420 | 1/2" | 5/16" | 1/4" | 5/32" | 3,700 | .38 |
| #40 | 1/2" | 5/16" | 5/16" | 5/32" | 3,700 | .42 |
| #50 | 5/8" | .400 | 3/8" | .200 | 6,100 | .69 |
Most Go Kart Chains and Mini Bike Chains have the Chain Size stamped directly on the Chain Links. #35 Chain, 40 Chain, 41 Chain, 420 Chain and 50 Chain are used on most American Go Karts and Mini Bikes. An 11 or 12 Tooth Clutch Sprocket usually indicates the use of 35 Chain. 10 Tooth Clutch Sprockets usually indicate the use of #40 Chain, 41 Chain or 420 Chain. Make sure you order enough chain, extra links can always be removed. Do not run the chain too tight, it will grind the sprocket teeth down in a short period of time.
 |
|
|
| ||||||||||||||||||||||||||||||||||||
| ||||||||||||||||||||||||||||||||||||
| ||||||||||||||||||||||||||||
| ||||||||||||||||||||||||||||
A chain consists of steel pins that are rubbing inside of "steel tubes". These are commonly called rollers, but it is obvious they do not roll. They just rub back and forth at very high speeds, under considerable load, pressure and heat. Squirting oil or even chain lube directly on these rollers does very little good unless the lubricant is given time to penetrate between each pin and the corresponding tube. The lube must go along the side links on each side of the chain, then allow 8 to 10 minutes for penetration and evaporation before starting the engine to ensure the centrifugal force will not sling it all away.
The clutch sprocket and the main drive sprocket should be perfectly aligned so they don't rub against the side links. Rubbing wears the teeth down rapidly and ABSORBS HORSEPOWER.
All chains stretch over time so when the chain starts coming off because it's too loose, move the engine forward or backward to take up the slack in the stretched chain. There does come a time when the chain is just too used up and needs to be replaced. The effect of wear on a roller chain is to increase the pitch (spacing of the links), causing the chain to grow longer. This is due to wear at the pivoting pins and bushes, not from actual stretching of the metal. A worn chain leads to the rapid onset of wear on the teeth of the sprockets, with ultimate failure being the loss of all the teeth on the sprocket. The sprockets (in particular the larger of the two) suffer a grinding motion that puts a characteristic hook shape into the driven face of the teeth. This effect is made worse by a chain improperly tensioned, but is unavoidable no matter what care is taken. The worn teeth and chain no longer provide smooth transmission of power. Both sprockets and chain should be replaced since a new chain on worn sprockets will not last long. In less severe cases, it may be possible to save the smaller of the two sprockets, since it's always the larger sprocket that suffers the most wear.
The lengthening due to wear of a chain is calculated by the following formula: %=((M-(S*P))/(S*P))*100
M = the length of a number of links measured. S = number of links measured. P = Pitch.
Replace a roller chain which has elongated 3% on an adjustable drive or 1.5% on a fixed-center drive. A simpler method is to attempt to pull the chain away from the larger of the two sprockets. Any significant movement (e.g. making it possible to see through a gap) probably indicates a chain worn up to and beyond the limit.
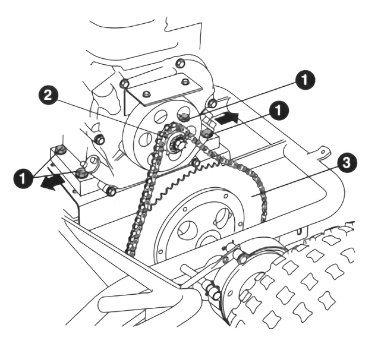
First, remove any guards covering the drive components.
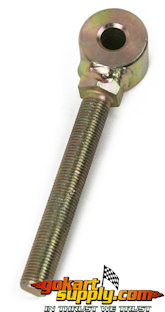
Then loosen - but do not remove, the four engine mounting bolts (1). Use an open end wrench and a socket wrench, most likely a 9/16. Slide the engine until you take up the slop in the chain.
Slide the engine as nessessary to obtain a 1/4" to 3/8" of chain flex.
Be sure the clutch sprocket (2) and the drive wheel sprocket (3) are perfectly aligned.
Securely tighten the four engine bolts. Re-check the chain tension.
Replace the guards covering the drive components. Install new guards, if damaged.
Do NOT over tighten the chain, it will wear down the sprocket teeth in record time!
For best chain life, lubricate with a graphite type lubricant such as a spray-on type that evaporates leaving graphite on the chain.
Motor oil is widely used but graphite type lubrication is superior.
 | ||||||||||||||||||||||||||||||||||||||||||||
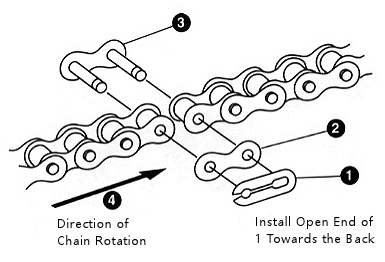
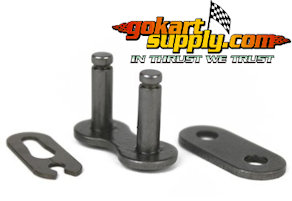
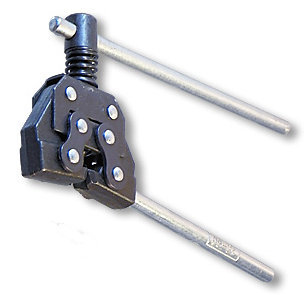
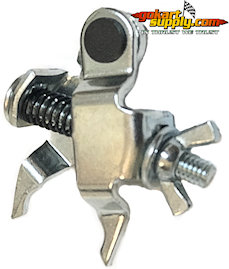
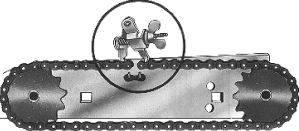
Removal
Remove the guards covering the drive components.
Rotate the drive wheel to place the master link (3) in an accessible position between the two sprockets.
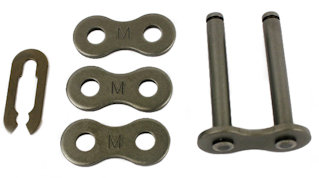
Slide the retaining clip (1) of the master link (3) until the reliefs are centered over the link pins. Remove the clip and side plate (2).
Slide the master link out and remove the chain.
Installation
Install new chain.
Slide the pin portion of the master link (3) in to each end of the chain to be connected.
Slide the side plate (2) portion of the master link on to the pins.
Slide the retaining clip (1) on to the pins until the clip snaps securely in to place.
Caution
The master link should be installed with the open end of the retaining clip (1) facing away from the direction of rotation (4).
 |
 | ||||||||||||||||
 | ||||||||||||||||
 | ||||||||||||||||
 | ||||||||||||||||
 | ||||||||||||||||
 | ||||||||||||||||
 | ||||||||||||||||||||
 | ||||||||||||||||
 | ||||||||||||||||
 | ||||||||||||||||
 | ||||||||||||||||
 | ||||||||||||||||
Hints that Help by Max-Torque: There are no rollers in 219 or #35 chains. Roller chain starts at 1/2" pitch chains which are: #40, #41, #420 and #428 and larger chains. The bigger the gap between the connecting roller link plate and the fixed roller link on the #35 chain, the easier it is to get lubrication in where it is needed. Chain binds on the inside of the roller NOT on the outside surface so spraying lube on the outside of the chain doesn’t accomplish much. Getting the lubrication between the pin and the plates is the secret on how to correctly lube the chain. How, when and what you lubricate with is the purpose of this article.
The inside of the clutch, when the engine is idling, acts like a fan drawing air around the drum to keep the shoes cool. Any excess oil on the chain is going to be sucked into the clutch. It will get on the shoes and in the drum and will have to be burnt off before the clutch will work consistently again. Check your blow-by line off the engine to make sure you have a good seal. It is very important to have the line hooked up properly because of where that oil can go and the problems it can cause. Using your blow-by line to lube your chain is not a very good idea and will cause more problems than it is worth.
The oil additives that can give you problems if they happen to get on your disc or in the drum of your clutch are: Slick 50, Dynamite, Energy Release and any oil that has Teflon or Silicone as one of the ingredients. Any oil that says it is anti-friction be very cautious what you use it on because Teflon or silicone are clutch killers. These are excellent internal engine oil ingredients but will give you fits if they get inside the clutch or on the brake disc. They do just what they are intended to do which is to prevent friction -- steel to steel contact. On a clutch and a brake system, you need friction to have them work properly. The bad news is these lubricants impregnate the steel. Sanding or cleaning with a solvent, brake cleaner or gasoline will not help. Once it is in the metal, it is in there forever because the heat will bring these lubricants back to the surface.
Now back to the chain and what to do to get it race ready. We only use a continuous link chain because master links always break at the worst time. Any chain manufacturer will tell you the weakest link on the chain is the master link. To oil our chain, we take it off and clean it with WD-40 and an air hose. I don’t like to use brake cleaner, solvent or gasoline because these will contaminate my oil bath. We then put our chain as well as our sprockets in a coffee can with 2" of 30 weight petroleum base automotive oil AND a 1/2 of a cube of paraffin wax that you can buy at the grocery store. There will be three cubes in the box, only use 1/2 of one cube.
The coffee can will be placed in a frying pan with a 1/2” of water in the bottom of the frying pan which acts then like a double boiler so we do not have direct heat on the coffee can. Now place it on the stove with the heat turned up to medium (180 degrees F(64.5C) for 30 to 45 minutes). When the wax melts into the oil you are done and you can now take it off the stove and hang the chain and sprockets over the can to let the excess drip back into the can to reuse many times. Do not bring the oil to a boil because we don’t want to break down the oil, we just want it hot to get the maximum penetration. The oilite bushing manufactures heat their oil up in a closed system, vacuum out the air that draws the oil into the pores of the bushing. In a new oilite bushing, 15% of the weight of the bushing is the oil that is impregnated into the oilite bushing using a vacuum system. The heat will cause the air to come to the surface of the oil. The void around the pin and roller link will be replaced by oil. The paraffin wax when it melts will act like a seal to keep the oil around the pin in the chain and seal the oil into the bushing. Take the chain out of the hot oil after it has soaked for at least 30 minutes and let the oil and wax drip back into the can to reuse the following week repeating the same process. When it has cooled down store the chain and sprockets away in a plastic bag. There is no need to wipe them off just mount the chain back on the kart when you are at the track next week. Put the sprocket back in the drum and you have enough lube in the chain or on the sprocket to last you a weekend of racing.
The oilite bushing used in a clutch contains sufficient oil to self-lube the sleeve upon which it is rotating for many races before it needs to be replenished. The oil comes out in very minute amounts and gets on the inside of the clutch drum, that is why it is a good idea to wipe out the inside of the drum before your final race of the day. Maintenance is very important on all clutches and preventive maintenance will give you consistency in a clutch. As the oil builds up on the shoes of the clutch and in the drum you start getting excessive slippage so now it is time to sand the shoes and the inside of the drum with some 80 grit sandpaper or emery cloth. After you sand the shoes and sand the inside of the drum wipe them off with a clean rag or blow them off with some air. I would only recommend brake cleaner on a steel shoe clutch never on a clutch that has phenolic resin material. Don’t spray it inside a clutch drum unless you have removed the sprocket. The reason they call it BRAKE CLEANER is that is what you should use it on. It is not really a clutch cleaner but if you use it to clean the clutch make sure you avoid getting any near the oilite bushing or roller bearing. You will contaminate the oilite bushing and no lubricant will stay for very long because the brake cleaner is breaking it down too fast. The other thing I observe when walking through the pits and watching crews clean a clutch, if a little spray is good, a ½ of can must be better yet. They end up spraying the inside of the drum containing the sprocket. If it has a bushing, the brake cleaner will dry out what lubrication is left in the bushing, so when it is put back together, the clutch wants to engage at idle on the line waiting to go out on the track. The safest thing to clean a clutch with is a paper towel or a clean rag, some WD-40 and an air hose. Wipe out the inside of the bushing with a paper towel or pull a rag through the bore, put some petroleum base oil on your finger and work it into the bushing. Follow these simple little tricks and a bushing clutch will never give you a problem. Remember a bushing or roller bearing are only functional when you are at idle, if the kart is moving the clutch is acting as ONE piece of steel.
![]()
|
|
Page Last Updated: 07/30/2026
© 1997-2026 Go Kart Supply, Inc
Terms and Conditions - Privacy Policy