
![]()
![]()
|
|
|
|
A chain consists of steel pins that are rubbing inside of "steel tubes". These are commonly called rollers, but it is obvious they do not roll. They just rub back and forth at very high speeds, under considerable load, pressure and heat. Squirting oil or even chain lube directly on these rollers does very little good unless the lubricant is given time to penetrate between each pin and the corresponding tube. The lube must go along the side links on each side of the chain, then allow 8 to 10 minutes for penetration and evaporation before starting the engine to ensure the centrifugal force will not sling it away. The clutch sprocket and the main drive sprocket should be perfectly aligned so they don't rub against the side links. Rubbing absorbs horsepower and damages components.
All chains stretch over time. When the chain starts falling off the sprocket then it's time to move the engine forward or backward to take up the slack in the stretched chain. There are four bolts that hold the engine on the motor mount plate. Take an open end wrench and a socket wrench, most likely a 9/16, and loosen the four bolts, pull back the engine until you take up the slop in the chain. Make sure both sprockets are perfectly aligned before you consider yourself done. Leave about 1/2 an inch of play between the top of the chain and the bottom, don't pull the engine back where the chain is as tight as you can get it. A tight chain can cause the kart to move in neutral with no one in the driver's seat, it puts friction on the clutch bushing which could cause it to engage when the engine is idling. Tight chains also wear the sprocket teeth down rapidly. Make sure you properly retighten the motor mount bolts when the sprockets are aligned and the desired chain tension has been achieved. You might not be able to slide the engine if the kart has a Torque Converter with a belt and a chain. You may have to remove a link or two from the chain. An offset half link can be used, if needed.
Replace the chain when installing a new clutch or sprocket. If you're cutting a new chain, be careful not to cut it too short. Make sure you order enough chain, you can always remove links but you can't add more than half a link. Determine the chain pitch size before you place an order. Most American made fun karts and mini bikes use either #35, 40, 41, 420 or 50 chain. Some chains have the chain pitch size stamped on the chain, some do not. Use the chart below as a guide. An 11 or 12 tooth clutch sprocket usually indicates the use of #35 chain. 10 tooth clutch sprockets usually indicate the use of #40, 41 or 420 chain. #50 Chain is not in the chain spec chart below, but we have it.
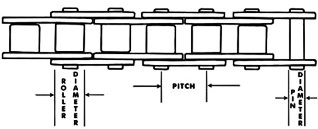
| Standard Roller Chain Specifications & Strengths | ||||||
|---|---|---|---|---|---|---|
| Chain Size |
Chain Pitch |
Roller Diameter |
Roller Width |
Pin Diameter |
Average Tensile |
Pounds Per Foot |
| #35 | 3/8" | 3/16" | 3/16" | 1/8" | 2,100 | .22 |
| #41 | 1/2" | 5/16" | 1/4" | 1/8" | 2,000 | .27 |
| #420 | 1/2" | 5/16" | 1/4" | 5/32" | 3,700 | .38 |
| #40 | 1/2" | 5/16" | 5/16" | 5/32" | 3,700 | .41 |
Remove, inspect and adjust the spark plug according to the Engine Owner's Manual each time the oil is changed. The electrodes should be kept clean and free of carbon and excess oil which will greatly deter proper engine performance.
If possible, check the spark plug gap (the area between the electrodes) using a wire feeler guage. Should be .030".
Before installing the spark plug coat the threads lightly with a graphite grease or anti-sieze compound to ensure easy removal when the spark plug requires future inspection.
It is advisable to replace your spark plug at least once each year to ensure easy starting and optimum engine performance.
You must change the oil in the crankcase after the first two hours of operating your new engine, and after each 25 hours of use thereafter. That will insure proper lubrication of internal parts and prevent costly repairs due to excessive wear.
WARNING: Disconnect the spark plug wire and place the wire where it can not make contact with the spark plug before changing the oil.
1) Remove the oil fill plug located on the rear side of the engine base. Tip the kart backwards slightly, by blocking up the front end and drain the oil into a suitable container.
2) Replace the oil fill plug and tighten securely. Place the machine back into a level position and refill the oil.
3) Check the oil level before each use. It only takes a few seconds.
Tip: An empty, plastic anti-freeze bottle can be used to make a great oil drain pan. Lay the bottle down on it's side. Cut out an opening large enough for the oil to drain into without making a mess. Save the cap and leave it in place until you are ready to pour the old oil into a proper container for disposal. The pan will have a handle and a funnel.
In the event your machine is not operated for periods in excess of 30 days and at the end of each season prepare for storage as follows:
1) Move the machine to an outdoor area.
2) Drain fuel tank and carburetor by allowing the engine to run out of fuel. All fuel remaining in the tank must be removed by using a suction device or by soaking up with a clean rag or towel.
3) Lubricate the engine cylinder by removing the spark plug and pouring one ounce of clean lubricating oil through the spark plug hole into the cylinder. Crank the engine slowly to spread the oil and replace the spark plug.
4) Do not save or store gasoline over the winter. Using old gasoline which has deteriorated from storage will cause hard starting and affect engine performance.
NEVER store gasoline in a building that has an open flame.
(1) Driving too slowly: A centrifugal clutch starts to engage around 2,000 rpm and will lock up around 2,600 rpm. Driving at speeds that allow the clutch to fully engage gives the clutch a chance to cool down. When the clutch is allowed to fully engage it locks the shoes in the clutch against the drum. When the clutch is not locked up, the shoes slip against the drum causing tremendous heat which dries up the lubrication in the oil impregnated bronze bushing. The tremendous amount of heat generated can also anneal the spring which is the heart of the clutch. If the shoes turn a blue-purple color from excessive heat, it's more than likely the clutch is ruined and the spring no longer has the ability to pull back the shoes at idle.
2) Short stop and go driving: The longer you drive at high throttle the better off it is for the clutch because it gives the clutch a chance to cool off before the next engagement. When the clutch is fully engaged there's no wear going on.
3) Driving with the foot on the brake: This is a problem with new drivers that are unsure of themselves. When riding a go kart for the first time, try to find an open area that has no obstacles that you have to maneuver around until you get use to the brake and gas pedals. The driver must first be able to build up his or her confidence on the kart before putting obstacles in their path. A small back yard is not a good place to learn to drive a go-kart. In my opinion, a minimum of ¾ of an acre is the yard needed for a go kart. Teach your child to drive with one foot on the pedal be it the brake or the gas but not to press on both pedals at the same time. You either want to go or to stop but you cannot do them both at the same time.
4) Changing the size of the tires. Putting on tires that are larger than what came with the kart will result in clutch problems. Tires exceeding 13" in diameter stress out a clutch if the kart is not properly geared for the larger tires. If you are driving on smooth flat terrain than you may be able to get by with 14" tires but once you get on hilly terrain, deep grass, then you are putting additional strain on the clutch, which will cause premature wear. Big tires look cool on a go kart but you create your own problem changing to a bigger tire when the clutch isn't designed to handle them. If you have tires over 15" tall you are required to use a torque converter instead of a centrifugal clutch. Do not install rims larger than six inches if your go kart is equipped with a centrifugal clutch.
5) Weight: A centrifugal clutch is designed to be able to move a certain amount of weight. Once the weight limit is exceeded, then the life of the clutch will be shortened. A good rule of thumb is the kart and driver (and passenger when it is a two seat kart) should not exceed 400 pounds. The kart weighs around 150 pounds add to this the driver (and passenger weight, if it is a two seater kart). If you know ahead of time that you will exceed the 400 pounds then buy a torque converter go-kart and avoid the problems of burning up the clutch asking it to do more than it was designed for. A torque converter has a variable speed system between the driver and the driven pulleys so it can improve upon this ratio, which gives the torque converter an advantage over a straight clutch system. It improves the ratio by approximately 3:1 and can turn larger tires and drive at slower speeds without doing any damage to the clutch system. A torque converter is a more expensive system initially but it will last longer and is more trouble free when maintained.
6) Restrictions: Do not try and reduce a kart's speed by limiting the travel of the gas pedal or by putting a restrictor in the carburetor to limit full rpm. Either of these methods will result in the clutch slipping, which is self-destructive. A clutch needs full rpm to lock up as quickly as possible to be able to start to cool down. To slow down a go-kart you would need to purchase a gear reduction unit, which is like training wheels on a go-kart until the driver gets accustomed to how the go-kart handles. A gear reduction unit can reduce the speed of the go-kart in half.
1) Oil the bushing that is located in the sprocket at least every two (2) hours of driving time. Where do you oil it? Right where you see the snap ring on the sprocket at the end of the clutch. There is a bronze bushing behind the snap ring that needs lubrication. With the engine off, squirt several drops of oil while the bushing is warm. At the same time oil the chain. What oil should I use? A good automotive oil like 10w30 or a straight 30HD weight oil is good, use the same oil used inside the engine. Once the chain gets "kinky" from lack of oil it should be replaced before it does damage to the clutch sprocket. A new chain is cheaper than a new clutch. If you keep the clutch and chain lubricated you should get years out of both. Oiling the chain after it gets dried out is a waste of time. Remember it is preventive maintenance, which means before the items get ruined.
2) Don't put oil inside the clutch. The holes on the drum of the clutch are to let the hot air out of the clutch. DO NOT SQUIRT OIL IN THESE HOLES! When oil gets in the drum portion of the clutch it will cause excessive slippage, which means undue heat will be generated.
3) The oils that can give you problems if they happen to get on your brake disc or in the drum of your clutch are: Slick 50, Dynamite, or Energy Release. These are excellent internal engine oils but will give you "fits" if they get inside the clutch or on the brake disc. They do just what they are intended to do which is to prevent friction -- steel to steel contact. On a clutch you need friction to have it engage and the same goes for a brake system. Because the oil comes out in very minute amounts and gets on the inside of the clutch drum. The clutch would only slip, it would not and could not lock up. This oil will impregnate the steel. Sanding and cleaning with a solvent or gas will not help. Once it is in the metal, it is in there forever because the heat will bring these lubricants back to the surface.
4) If your kart has a grease fitting in the crankshaft for lubrication then a shot of grease twice a month should be sufficient lubrication. The grease is coming from the inside of the sprocket outward, which is a better way to lubricate the clutch. The keyway in the crankshaft acts as a reservoir for the grease, which cuts down on the frequency needed for maintenance compared to oiling the snap ring area. The chain still needs to be oiled frequently to keep it from kinking up. There are some excellent chain sprays available that are waxy and will not let sand and dirt adhere to them. Dirt and sand will wear the chain as well as the sprockets.
If your go kart takes off by itself when the engine is started, with no one in the drivers seat, that is an indication that the clutch is badly in need of lubrication. Turn the engine off and park the machine up against a tree or fence to prevent it from taking off when you crank the engine again. You can also put the rear end up on centerblocks so the rear wheels are not touching the ground. Lubricate as needed. Give the lube enough time to penetrate, then start the engine. If the machine continues to take off by itself even after the clutch has been oiled, the clutch is burned up and must be replaced.
How long will the clutch last? If put on the crankshaft properly and observing all the hints that are pointed out in this article, a clutch should last many years. But if it is improperly installed, driven in abusive conditions (lack of oil, sand, steep terrain, excessive weight in the kart, wheels that are to tall), the clutch might only last 20 minutes.
Teach your child how to do maintenance on the kart or mini bike and accept responsibility for its upkeep. Every second tank of gas in the kart is about the interval for oiling the chain and the bushing. Oil the clutch even more often if an unexperienced driver is riding the machine around slow without gaining enough speed to engage the clutch all the way. If your child learns to do this preventive maintenance your machine should be enjoyable for many years. Who knows, if the kart is taken care of you may one day watch your children's children ride the machine, Priceless.
Always make sure all the pieces of the old clutch are removed from the crankshaft before attempting to install a new clutch. It's not uncommon to think all of the old clutch has been removed when it hasn't.
If your crankshaft is rusty, clean the end of the crankshaft with a wire brush. You should be able to see the end of the keyway cut into the crankshaft. Dig as much rust as you can out of the keyway and spray some penetrating oil between the clutch hub and the crankshaft. There are often one or two set screws in the clutch hub, near the engine and perpendicular to the crankshaft, which bind the hub to the shaft. Remove them if they are present. If your clutch is in pieces coming off and being difficult to remove completely, disassemble all the pieces from the clutch hub. Once all the other pieces have been removed you should beable to get a grip on the clutch hub with a gear puller and pull it off (don't forget to use penetrating oil). Be sure to put a bolt in the end of the crank to protect the threads inside. If you don't have one, you can rent a gear puller from an auto-parts store for around $10.00 to $20.00 a day.
If a gear puller won't work you will have the cut the clutch hub off without damaging the crankshaft or oil seal. A cutting torch will most certainly burn your oil seal, so replace the oil seal if you use heat. A high-speed die-grinder with a thin abrasive disk cutting wheel is one possible tool to use in this situation. We score a deep gouge in the thick part of the clutch hub, parallel to the crankshaft, being careful not to cut all the way to the crank. Then use a blunt chisel and a hammer to break the clutch hub along the score line. This loosens the hub enough that it comes off easily with a puller.
1) The brake rod should be adjusted (effectively shortened) if the brake pad doesn't press hard enough to stop the kart.
2) To adjust the brake, shorten the brake rod by removing the fastener through its forward end, then reassemble the connection by using the next hole toward the rear.
WARNING - Do not overtighten the fasteners, the pedal must be able to move freely.
3) Additional adjustment can be made in a similar manner to vehicles equipped with a scrub brake system ("brake paddles" that rub your back wheels to a stop), which can also be adjusted at the rear of the brake rod where it attaches to the brake lever.
WARNING - Ensure proper fasteners in good condition are installed throughout the brake system. Failure of these fasteners may cause brakes to fail.
Information on Band Brakes: Drum and Band Type (Band Brakes Page) Pictures of brake bands, drums, cables and hardware. Brake band installation instructions.
Information on Disc Brakes: Mechanical disc and rotor type (Disc Brakes Page) Disc brake adjustment instructions, parts breakdown of common mechanical disc brake caliper assembly, caliper assembly maintenance information, instructions for replacement of disc brake pads and parts pictures.
A helmet that fits properly for each rider.
An oil squirt can with a spout.
A clean gas can, preferably a small, plastic can.
A chain breaker tool.
Extra chain and connecting links.
A set of standard tools.
A low pressure tire gauge.
A spark plug wrench.
"Now You Know, and Knowing is Half The Battle" - G.I. Joe
![]()
|
|
Page Last Updated: 04/26/2024
© 1997-2024 Go Kart Supply, Inc